This school year is going to be unlike any other year we have experienced. With that in mind, our goal was to create a virtual tour for our students to help them learn the school since they weren’t able to come tour or meet the teachers like they have done in years past. We wanted to especially provide something to our upcoming 4th graders who would be new to the school and could use a guide to where everything is in the school.
There were several different options for this process, but we decided on a Google Slideshow that was interactive and easy for the parents and students to use. Oh, and FREE!

The first and biggest stop of the process is to plan out the design of your virtual tour. When planning your tour, think about:
- What image will you use for your main cover background? Will it be a picture of the school or a more generic picture? Have this decided beforehand.
- Will you have each teacher decorate their own slide, have them record a video for the slide, or have some other template they complete? Have your teachers have their slide contents ready and submitted before you get to the hyperlinking portion of the directions.
- How will you share your virtual tour with everyone? Will you use a sharable view only link to your school Facebook page? Will you send the link out through a messaging service your school uses such as Remind or ClassroomDOJO?
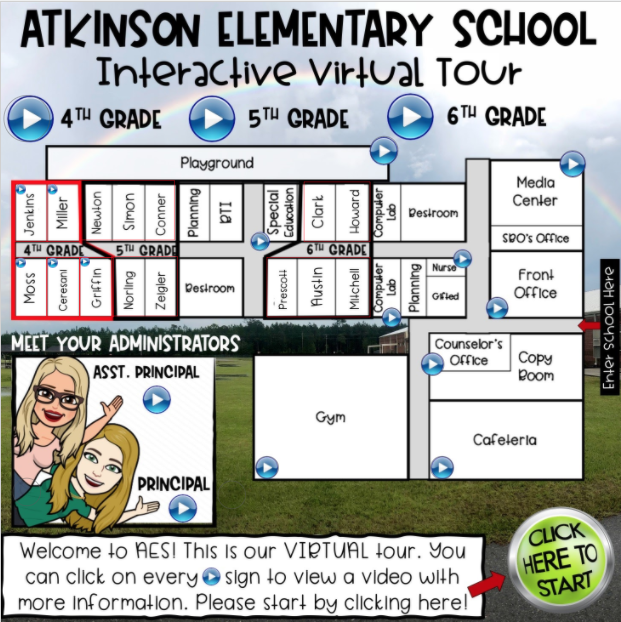
Directions for the Virtual Tour:
- In powerpoint, create your school outline using tables and squares. Make sure the boxes are filled in with white (or whatever color you’d like them to be for your image). Once you have your school outline complete, highlight all the boxes and save it as a PNG image.
- In PowerPoint, create your background image
- Decide on the shape and size you want your virtual presentation to be. I recommend an 8×8 square because it will fit the computer and a phone well
- Find the image you want for your background and make it your background image.
- Add the school outline to your image and add any extra pictures, labels, or details you’d like to have on your main page. I added my principal’s and my Bitmoji here, a “Start Here” button for the virtual tour introduction, and a place for each grade level to watch an introduction video.
- Once you’ve added all the details you’d like for your main page, export the slide as a PNG or JPEG image.
- Open Google Slides and change the page set-up to match your powerpoint slide size (8×8 for our presentation). Add your saved image from ppt as your background for your Google Slide
- Cover your Google Slide with a clear square and hyperlink the clear square to slide 1 (the slide you are on). This prevents the slide from switching to the other slides and will prevent confusion for the parents and students
- Add your extra slides for each teacher and for your extra information you are providing such as your welcome video, administration slides, connections class information, etc…
- If each teacher designed their own slide for the presentation, you will copy-paste their slides in here
- If each teacher recorded a video, you will add each video to a different slide
- Add the slide design/background prior to adding your video
- Title each slide with the teacher’s name/subject/grade or however you want to label the slides
- Add a “HOME” button to the corner of each additional slide and hyperlink it to slide 1 (Control K opens hyperlink, then select slide 1)
- Add clear shapes over each classroom and where you want all your hyperlinks to go. For each clear shape, add a hyperlink to the matching slide in the presentation. You will want to make sure you match the correct slide to the correct shape to prevent any confusion
- Change the share settings for the presentation to “Anyone with this link can view” then go to the link and change the word “edit” to “preview” in the web address. Copy the new link with the word “preview” in it. This will be the link you share with parents

- Preview your virtual tour and double-check for any mistakes, changes, or possible typos. You can make any edits to your presentation and it will not affect the link you’ve already created, so do not worry about making edits after you’ve gotten (or even shared) your link. It will automatically update what others see when you make changes
- Share your link with parents, staff, and on the school website/social media pages

Please let me know if you have any questions or need anything as you design your virtual tour!
Happy Virtual Touring!
 The Perfect Way to Head into the Holiday Break
 From Building a Platform to Building a Community (Coaching Advice)
 *My Word for 2018*